Python Programming Guide
คู่มือการเขียนโปรแกรมควบคุม myCobot 280 JN ด้วย Python ผ่านไลบรารี pymycobot
ครอบคลุมตั้งแต่ติดตั้ง, การควบคุมข้อต่อ, พิกัด, Gripper, IO และตัวอย่างใช้งานจริง
8.0 ถ้าคุณยังไม่เคยเขียน Python
บทนี้สอนเขียนโปรแกรมควบคุมแขนกลด้วย Python ถ้าคุณยังไม่คุ้นกับศัพท์เหล่านี้ อ่าน 3 นาทีก่อนเริ่มจะช่วยให้เข้าใจโค้ดทั้งบทง่ายขึ้นมาก
import โหลดเครื่องมือสำเร็จรูปมาใช้
(เหมือนหยิบหนังสือจากชั้นมาวางบนโต๊ะก่อนเปิดอ่าน)
from pymycobot import MyCobot280
"จากกล่องเครื่องมือ pymycobot ขอหยิบของชื่อ MyCobot280 ออกมา"
mc = MyCobot280(...)
สร้างตัวแทน "หุ่นยนต์" เก็บไว้ในชื่อ mc
ต่อไปจะสั่งหุ่นยนต์ผ่านชื่อนี้
mc.send_angles(...)
สั่งให้ตัวแทน mc ทำสิ่งหนึ่ง (= "method call")
print(...)
แสดงข้อความออกหน้าจอ ใช้ดูค่าตอนทดสอบ
โค้ดบรรทัดละบรรทัด
โค้ดทั่วไปของ pymycobot จะมีรูปแบบนี้ แปลเป็นภาษาคน:
python annotated# บรรทัด 1: หยิบ "ตัวควบคุมหุ่นยนต์" จากไลบรารี pymycobot
from pymycobot import MyCobot280
# บรรทัด 2: หยิบฟังก์ชันจัดการเวลามาใช้
import time
# บรรทัด 3: สร้างตัวแทนหุ่นยนต์ — เก็บไว้ในชื่อ "mc"
# '/dev/ttyTHS1' = ช่อง Serial ที่ใช้คุยกับหุ่นยนต์
# 1000000 = ความเร็วการสื่อสาร (1 Mbps)
mc = MyCobot280('/dev/ttyTHS1', 1000000)
# บรรทัด 4: สั่งหุ่นยนต์ขยับ
# [0, 0, 0, 0, 0, 0] = ตั้งทุกข้อต่อให้เป็น 0 องศา (ท่าตรง)
# 50 = ความเร็ว 50% (เคลื่อนนุ่มนวล)
mc.send_angles([0, 0, 0, 0, 0, 0], 50)
# บรรทัด 5: รอ 3 วินาทีให้หุ่นยนต์ขยับเสร็จก่อน ไม่งั้นจะส่งคำสั่งต่อไปทันที
time.sleep(3)
# บรรทัด 6: ถามตัวแทน mc ว่าตอนนี้ joint แต่ละข้อมุมเท่าไหร่ แล้วแสดงผล
print(mc.get_angles())ถ้าคุณยังไม่เคยเขียน Python เลย แนะนำให้เรียนพื้นฐาน 30 นาทีก่อน: Python tutorial (official) หรือ W3Schools Python รู้แค่ variable, function call, list, if/for loop ก็พอ
Python case-sensitive MyCobot280 ≠ mycobot280
และ indentation สำคัญ บรรทัดที่ขึ้นต้นด้วย space/tab ต้องสม่ำเสมอ
Copy โค้ดทั้งบล็อก ปลอดภัยกว่าพิมพ์เองเสมอ ใช้ปุ่ม "คัดลอก" มุมขวาบนของ code block
8.1 ติดตั้งและตรวจสอบสภาพแวดล้อม
Jetson Nano ที่มากับชุดได้ติดตั้ง Python 3 และ pymycobot มาให้แล้ว
ตรวจสอบเวอร์ชันก่อนเริ่มใช้งาน:
python3 --version
pip3 list | grep pymycobot
ถ้ายังไม่มีหรือต้องการอัปเดต:
terminalpip3 install pymycobot --upgrade --user
pymycobot รุ่นใหม่แนะนำให้ใช้คลาส MyCobot280 (ตัวเลขรุ่นในชื่อคลาส)
ส่วนรุ่นเก่าใช้ MyCobot ทั้งสองยังใช้งานได้ แต่คู่มือนี้จะใช้คลาสใหม่
8.2 เริ่มต้น: เชื่อมต่อหุ่นยนต์
pythonfrom pymycobot import MyCobot280
import time
# Jetson Nano ใช้พอร์ต /dev/ttyTHS1 baudrate 1,000,000
mc = MyCobot280('/dev/ttyTHS1', 1000000)
# เปิดใช้งานข้อต่อทั้งหมด
mc.power_on()
mc.focus_all_servos()
# ตรวจสอบว่าควบคุมได้
print("Power:", mc.is_power_on())
print("Angles:", mc.get_angles())หากเปิด myBlockly หรือโปรแกรมอื่นที่ใช้พอร์ตเดียวกันอยู่ จะรันสคริปต์ Python ไม่ได้ ปิด myBlockly ก่อนรัน Python
8.3 ควบคุมข้อต่อ (Joint Control)
ระบุมุมข้อต่อทั้ง 6 ค่า เป็นองศา ดูช่วงในตาราง 7.2
ส่งมุมเดียว
python# mc.send_angle(joint_id, degree, speed)
mc.send_angle(1, 40, 20) # หมุน Joint 1 ไป 40° ความเร็ว 20%ส่งมุมพร้อมกันทั้ง 6 ข้อ
python# กลับตำแหน่งเริ่มต้น
mc.send_angles([0, 0, 0, 0, 0, 0], 50)
time.sleep(3)
# ท่าทำงาน
mc.send_angles([18.36, 6.5, -124.45, 26.54, -1.84, -110.47], 80)ตัวอย่างจริง Before/After/Home (ใช้ heredoc)
ทดสอบครบ flow ด้วย heredoc ผ่าน Terminal:
terminalpython3 << 'EOF'
from pymycobot import MyCobot280
import time
mc = MyCobot280('/dev/ttyTHS1', 1000000)
time.sleep(1)
mc.power_on()
print("Before:", mc.get_angles())
mc.send_angles([30, 0, -30, 0, 30, 0], 40)
time.sleep(3)
print("After:", mc.get_angles())
mc.send_angles([0, 0, 0, 0, 0, 0], 40)
time.sleep(3)
print("Home:", mc.get_angles())
EOF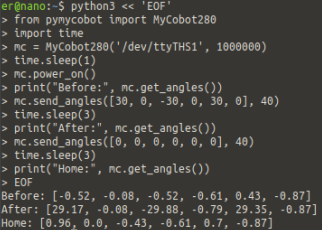
[30,0,-30,0,30,0], Home คือกลับมา [0,0,0,0,0,0] ครับสังเกตว่าค่าจริงไม่ตรง 0.00 เป๊ะ เป็นเรื่องปกติของ servo (±1° tolerance)อ่านค่ามุมปัจจุบัน
pythoncurrent_angles = mc.get_angles()
print(current_angles)
# [0.0, -45.5, 30.2, 0.0, 0.0, 0.0]ส่งแบบ Synchronous (รอจนจบ)
python# รอจนเคลื่อนถึงตำแหน่งจริง (timeout=15 วินาที)
mc.sync_send_angles([0, 0, 0, 0, 0, 0], 50, timeout=15)
print("ถึงตำแหน่งแล้ว")8.4 ควบคุมพิกัด (Coordinate Control)
ใช้พิกัด XYZ + Rx Ry Rz เพื่อสั่งให้ปลายแขนไปยังจุดที่ต้องการ เหมาะกับงานหยิบจับวัตถุที่รู้ตำแหน่งในโลกจริง
ส่งพิกัดทั้ง 6 ค่า
python# mc.send_coords([X, Y, Z, Rx, Ry, Rz], speed, mode)
# mode: 0 = moveJ (เร็ว, ไม่เป็นเส้นตรง), 1 = moveL (เป็นเส้นตรง)
mc.send_coords([158.4, -66.9, 77.9, 179.01, 0.88, 52.41], 80, 1)
time.sleep(2)อ่านพิกัดปัจจุบัน
pythoncoords = mc.get_coords()
print(coords)
# [200.0, 100.0, 150.0, 0.0, 0.0, 0.0]ปรับแกนเดียว
python# เลื่อน Z (ขึ้น/ลง) อย่างเดียว
mc.send_coord(3, 200, 50) # แกน 3 = Z, ตั้งเป็น 200mmตัวอย่างจริง: เคลื่อนไปจุดเก็บงาน (mode=1 เส้นตรง)
python coord_example.pyfrom pymycobot import MyCobot280
mc = MyCobot280('/dev/ttyTHS1', 1000000)
# อ่านพิกัดปัจจุบัน
current = mc.get_coords()
print("ตอนนี้อยู่ที่:", current)
# เคลื่อนเป็นเส้นตรง (moveL) ไปยังจุดเก็บงาน
# coords = [X, Y, Z, Rx, Ry, Rz], speed=80, mode=1
target = [57.0, -107.4, 316.3, -93.81, -12.71, -163.49]
mc.send_coords(target, 80, 1)แปลงมุมเป็นพิกัด / แก้สมการ Inverse Kinematics
python# แปลงมุม -> พิกัด
target_coords = mc.angles_to_coords([0, 0, 0, 0, 0, 0])
# แก้สมการย้อนกลับ (พิกัดเป้าหมาย -> มุม)
current = mc.get_angles()
new_angles = mc.solve_inv_kinematics(
[200, 100, 150, 0, 0, 0],
current
)
mc.send_angles(new_angles, 50)8.5 ควบคุมการเคลื่อนที่ (Motion Control)
python# หยุดชั่วคราว / กลับมาทำงานต่อ / หยุดเด็ดขาด
mc.pause()
mc.resume()
mc.stop()
# ตรวจสอบสถานะ
print("Moving:", mc.is_moving())
print("Paused:", mc.is_paused())
# ตรวจว่าอยู่ในตำแหน่งเป้าหมายหรือไม่
target = [0, 0, 0, 0, 0, 0]
arrived = mc.is_in_position(target, 0) # flag=0 = joint angles, 1 = coordsJOG (เคลื่อนที่ต่อเนื่อง)
เหมาะกับงานสอนตำแหน่ง (Teach Pendant) กดให้เคลื่อนต่อเนื่อง ปล่อยให้หยุด
python# jog_angle(joint_id, direction, speed) direction: 0=ลด 1=เพิ่ม
mc.jog_angle(1, 1, 50)
time.sleep(1)
mc.stop()
# jog ทีละขั้น (increment)
mc.jog_increment_angle(2, 5.0, 30) # ขยับ Joint 2 ไป +5° ทันที8.6 ควบคุม Gripper
ชุดนี้ใช้ Adaptive Gripper ระบุด้วย type=1 (ค่าเริ่มต้น)
# เปิด/ปิด Gripper — flag: 0=เปิด, 1=ปิด, 254=หยุดที่ตำแหน่งปัจจุบัน
mc.set_gripper_state(1, 50)   # ปิด, ความเร็ว 50
time.sleep(1)
mc.set_gripper_state(0, 50)   # เปิด

# ตั้งค่าการเปิดเป็น %
mc.set_gripper_value(50, 80)  # เปิด 50% ความเร็ว 80

# อ่านค่าปัจจุบัน
opening = mc.get_gripper_value()
print(opening)

# ตั้งแรงบีบของ Adaptive Gripper (150-980)
mc.set_HTS_gripper_torque(500)
8.7 IO Control
RGB LED ที่ปลายแขน (Atom)
python# ตั้งสี LED (RGB 0-255)
mc.set_color(255, 0, 0) # แดง
mc.set_color(0, 255, 0) # เขียว
mc.set_color(0, 0, 255) # น้ำเงินDigital IO ที่ปลายแขน (Atom IO)
python# ตั้งโหมดพิน
mc.set_pin_mode(1, 0) # 0=output, 1=input, 2=input_pullup
# Output
mc.set_digital_output(1, 1) # HIGH
mc.set_digital_output(1, 0) # LOW
# Input
value = mc.get_digital_input(2)
# PWM
mc.set_pwm_output(channel=1, frequency=1000, pin_val=128)Basic IO ที่ฐาน (Base IO)
python# คุมอุปกรณ์ผ่าน Basic IO ของฐาน
mc.set_basic_output(5, 0) # เปิดสุญญากาศ (รุ่น M5)
mc.set_basic_output(5, 1) # ปิดสุญญากาศ
mc.set_basic_output(2, 0) # ปล่อยลม
mc.set_basic_output(2, 1) # หยุดปล่อยลมGPIO ของ Jetson Nano (สำหรับ AIKit Pump)
pythonimport Jetson.GPIO as GPIO
GPIO.setmode(GPIO.BCM)
GPIO.setup(20, GPIO.OUT) # Pin 38 = BCM 20 (ดูดอากาศ)
GPIO.setup(21, GPIO.OUT) # Pin 40 = BCM 21 (ปล่อยอากาศ)
# Logic Invert: 0 = ON, 1 = OFF
GPIO.output(20, 0) # ดูด
GPIO.output(21, 1) # ปิดวาล์วปล่อย
# ปิดและคืนค่า
GPIO.output(20, 1)
GPIO.cleanup()8.8 ตรวจสอบสถานะและจัดการ Error
python# เวอร์ชันระบบ
print(mc.get_system_version())
print(mc.get_basic_version())
# Error
err = mc.get_error_information()
# 0 = ปกติ, 1-6 = joint เกินขีดจำกัด, 16-19 = ตรวจพบการชน
if err != 0:
print(f"Error code: {err}")
mc.clear_error_information()
# สถานะข้อต่อแต่ละข้อ
voltages = mc.get_servo_voltages() # < 24V
temps = mc.get_servo_temps() # °C
speeds = mc.get_servo_speeds() # steps/s
print(f"Voltage: {voltages}, Temp: {temps}")ใส่ mc.get_error_information() เป็นระยะในลูปทำงานยาว ๆ
จะช่วยให้จับ Error ได้ทันก่อนหุ่นยนต์เสียหาย
8.9 ควบคุมระยะไกลผ่าน TCP/IP
หากต้องการสั่งหุ่นยนต์จากเครื่องอื่นในวง LAN เดียวกัน
ใช้คลาส MyCobot280Socket แทน API methods เหมือนเดิมทุกประการ
ฝั่ง Jetson Nano (Server)
รัน server bundle ที่มากับ pymycobot:
terminal บน Jetsonpython3 -m pymycobot.serverฝั่ง Client (PC ภายนอก)
pythonfrom pymycobot import MyCobot280Socket
# IP ของ Jetson Nano, port 9000
mc = MyCobot280Socket("192.168.10.10", 9000)
# ใช้คำสั่งเดิมได้เลย
mc.send_angles([0, 0, 0, 0, 0, 0], 50)
print(mc.get_coords())8.10 ตั้งค่ากรอบอ้างอิง (Reference Frames)
ปรับให้พิกัดสะดวกกับงาน เช่น กำหนดให้ Origin อยู่ที่มุมโต๊ะ ไม่ใช่ฐานหุ่นยนต์
python# ตั้ง Tool frame (อ้างจากปลายเครื่องมือ)
mc.set_tool_reference([0, 0, 80, 0, 0, 0]) # tool ยาว 80mm
mc.set_end_type(1) # 1=tool, 0=flange
# ตั้ง World frame (เปลี่ยน origin)
mc.set_world_reference([100, 100, 0, 0, 0, 0])
mc.set_reference_frame(1) # 1=tool, 0=base
# เลือกประเภทการเคลื่อนที่
mc.set_movement_type(1) # 1=moveL (เส้นตรง), 0=moveJ8.11 ตัวอย่างใช้งานสมบูรณ์
สคริปต์ครบครันที่รวมการเชื่อมต่อ, เคลื่อนที่, ตรวจสอบสถานะ และจัดการ Error:
python full_example.pyfrom pymycobot import MyCobot280
import time
def main():
mc = MyCobot280('/dev/ttyTHS1', 1000000)
mc.power_on()
mc.focus_all_servos()
time.sleep(0.5)
# เริ่มที่ Home
mc.send_angles([0, 0, 0, 0, 0, 0], 50)
time.sleep(3)
# ตั้งสี LED เป็นเขียว (พร้อมทำงาน)
mc.set_color(0, 255, 0)
# ทำงาน 5 รอบ
for i in range(5):
print(f"Loop {i+1}/5")
mc.send_coords([200, 0, 200, 0, 0, 0], 50, 1)
mc.sync_send_coords([200, 0, 100, 0, 0, 0], 30, 1, timeout=15)
time.sleep(0.5)
# ตรวจสอบ Error
err = mc.get_error_information()
if err != 0:
print(f"⚠️ Error: {err}")
mc.set_color(255, 0, 0) # แดง
mc.clear_error_information()
break
mc.send_coords([200, 0, 200, 0, 0, 0], 50, 1)
time.sleep(0.5)
# เสร็จงาน
mc.send_angles([0, 0, 0, 0, 0, 0], 50)
time.sleep(2)
mc.set_color(0, 0, 0) # ดับไฟ
print("Done.")
if __name__ == "__main__":
main()เอกสาร API ฉบับเต็มของ pymycobot อยู่ที่
docs.elephantrobotics.com/pymycobot
และ source code ที่ GitHub
8.12 ปรับความแม่นยำด้วย PID Control
ทุก Servo ของ myCobot ใช้ PID Controller (Proportional + Integral + Derivative) ภายในเพื่อรักษาตำแหน่ง การปรับ gain ของ PID จะมีผลต่อ:
- ความนุ่มนวล ของการเคลื่อนที่ (กระตุก vs ลื่นไหล)
- ความแม่นยำ ในการหยุดที่ตำแหน่งเป้าหมาย
- แรงต้านการรบกวน (จะนิ่งเมื่อมีแรงดันจากภายนอกหรือไม่)
อ่านค่า PID ปัจจุบัน
python# อ่าน PID ของ joint แต่ละข้อ
for joint_id in range(1, 7):
p = mc.get_servo_data(joint_id, 21) # P gain (address 21)
i = mc.get_servo_data(joint_id, 23) # I gain (address 23)
d = mc.get_servo_data(joint_id, 22) # D gain (address 22)
print(f"Joint {joint_id}: P={p}, I={i}, D={d}")ปรับค่า PID
python# mc.set_servo_data(joint_id, address, value)
# address: 21=P, 22=D, 23=I
# เพิ่ม P ให้ joint 2 ตอบสนองไวขึ้น
mc.set_servo_data(2, 21, 12) # P=12 (ค่าตั้งต้น ~10)
# ลด D ให้นุ่มนวลขึ้น (แต่อาจ overshoot)
mc.set_servo_data(2, 22, 5)
# บันทึกค่าใหม่เข้า EEPROM (ค้างไว้แม้ปิดเครื่อง)
mc.servo_data_write_to_flash(2)การปรับ PID ผิดอาจทำให้ servo สั่น / overshoot รุนแรง / ร้อนเกินไป
ปรับทีละน้อย (±2 ต่อครั้ง) และทดสอบทุกครั้ง หากผิดให้ servo_restore() กลับค่า default
โหมดสำเร็จรูป (Quick Presets)
Elephant Robotics จัดเตรียม 2 preset ที่ใช้บ่อยไว้ ค่าเขียนที่ address 23 (I gain):
| โหมด | ค่า I | เหมาะกับ |
|---|---|---|
| Smooth Motion | 0 | เคลื่อนนุ่มนวล เสถียร เหมาะกับงานสาธิต/วาด แต่อาจคลาดเคลื่อนเล็กน้อย |
| High Precision | 4 | หยุดตรงจุดเป้า เหมาะกับ Pick & Place แต่อาจสั่นเล็กน้อยรอบจุดเป้า |
# Apply Smooth Motion preset ให้ทุก joint
for j in range(1, 7):
    mc.set_servo_data(j, 23, 0)   # 0 = smooth, 4 = precision
    time.sleep(0.1)

# ตรวจสอบค่าหลัง set
for j in range(1, 7):
    print(f"Joint {j} I-gain:", mc.get_servo_data(j, 23))
รีเซ็ตกลับค่า default
python# คืนค่า PID ของ joint เดียวกลับเป็น factory default
mc.servo_restore(2)
# หรือคืนทุก joint
for j in range(1, 7):
mc.servo_restore(j)วิธีคลาสสิก Ziegler-Nichols: ตั้ง I=0, D=0 เพิ่ม P จนเริ่มสั่น (ค่านี้คือ Ku) ตั้ง P=0.6×Ku, I=2×P/Tu, D=P×Tu/8 (Tu = คาบของการสั่น) สำหรับ myCobot ค่า default มักจะดีอยู่แล้ว ปรับเฉพาะกรณีที่มีปัญหา
8.13 Serial Communication Protocol (ระดับต่ำ)
หากต้องเขียน driver ในภาษาอื่นที่ไม่ใช่ Python (เช่น C++, Rust, Go, Node.js) หรือต้องการสื่อสารกับหุ่นยนต์ผ่านโปรโตคอลเอง สามารถใช้ Serial Protocol ของ myCobot ได้
รูปแบบ Frame
ทุกคำสั่งและการตอบกลับใช้ frame format เดียวกัน:
protocol bytes┌──────┬──────┬─────────┬──────────┬───────────┬──────┐
│ 0xFE │ 0xFE │ length │ command │ data... │ 0xFA │
└──────┴──────┴─────────┴──────────┴───────────┴──────┘
Header (2) 1 byte 1 byte N bytes Footer
length = 1 (command) + N (data)ตัวอย่างคำสั่งสำคัญ
| Function | Command (hex) | Data Format | หมายเหตุ |
|---|---|---|---|
| power_on | 0x10 | เปิดเซอร์โว | |
| power_off | 0x11 | ปิดเซอร์โว | |
| get_angles | 0x20 | response 6×int16 | คืนค่ามุมทั้ง 6 (× 100) |
| send_angles | 0x22 | 6×int16 + speed | มุม × 100 + speed (1-100) |
| get_coords | 0x23 | response 6×int16 | X,Y,Z × 10 + Rx,Ry,Rz × 100 |
| send_coords | 0x25 | 6×int16 + speed + mode | mode: 0=moveJ, 1=moveL |
| is_moving | 0x2B | response 1 byte | 1=moving, 0=stopped |
| set_color | 0x6A | 3 bytes RGB | LED ที่ Atom |
รายการคำสั่งครบ + Encoding details ของแต่ละ data type ดูที่ Elephant Docs Communication Protocol
ตัวอย่าง: ส่ง send_angles แบบ raw bytes
ส่งคำสั่งให้แขนกลับ Home ([0,0,0,0,0,0] speed=50) โดยไม่ใช้ pymycobot:
python raw_serial.pyimport serial, struct
ser = serial.Serial('/dev/ttyTHS1', 1000000, timeout=1)
# Build frame: FE FE [len] [cmd=0x22] [6×int16 angles ×100] [speed=50] FA
angles = [0, 0, 0, 0, 0, 0] # องศา
speed = 50
data = b''.join(struct.pack('>h', a * 100) for a in angles)
data += struct.pack('>B', speed)
length = 1 + len(data) # 1 byte cmd + payload
frame = bytes([0xFE, 0xFE, length, 0x22]) + data + bytes([0xFA])
ser.write(frame)
print("sent:", frame.hex(' '))ส่วนมากแนะนำใช้ pymycobot เพราะดูแลรายละเอียดให้หมด
ใช้ raw protocol เมื่อ:
(1) เขียนภาษาอื่นที่ไม่มี wrapper,
(2) ต้องการ control timing แม่นยำระดับ ms,
(3) ต่อกับระบบฝังตัวอื่นที่ไม่มี Python